Sunday, May 17, 2009

Warcaster

I put together this warcaster as a kitbash of the Privateer Press Epic Warcaster Pirate Queen Skarre figure as well as one from Reaper miniatures. My biggest hurdle was trying to get the miniature onto the bow sprite thingy (yes it is a technical term just ask Richard Dean Anderson). I wanted to give the ship an old and mold covered appearance which is why I chose those colors. I still want to add some water effects and will trying out some clear silicone for that.

You should got to the photobucket account and look at the larger pic as the detail is lost on this one. I just found her horns so I have to paint them and add them too her.

She is the leader of my Cryx army that I am building. I will be doing a pirate theme arrrgh. I will be branching out soon as I found some interesting aliens that I wanna build called the Quar.

I am also interested in trading away some Cryx figs that I have and have posted them over at bartertown. If anyone is interested you can contact me there or look for Soldat on the miniatures page.

Photobucket

Saturday, May 16, 2009

The Sheriff's new friend

Weeel looky here we gots us a hangin contraption. Be on the look out all ye ne'er do wells and other lowly criminal types. The town gallows has been built and is ready for use noose and all.

This actaully ended up being slightly more complicated than I had expected. I kept changing the heights for the legs as well as the gallows supports so it would look right. I might fashion a handle for the trap door. I was going to etch both sides of the structure but have found that doing so really weakens the balsa. I will need to make a stairs for it. I was trying to cut some stringers but the way the grain was they kept breaking.

I made the noose out of cooking string and painted it the same color as my WWII russians. I was surprised that I was actually able to tie a noose with this string and I think it looks right. I will use this string as a bell pull for my church as well. I used a clove hitch knot to secure it place on the cross member and support beam as well.


Photobucket

Thursday, May 14, 2009

Terrain Tips

I posted this over at TMP and thought it good enough for my blog as well.

Laying out the buildings, I can't recommend enough of using a thick cardstock for your basic shapes like the walls, roof ends, roof, windows, and doors. I also tend to make a rough sketch of what I want to make so I don't stray too far off. I ended up resizing my Livery Stable after I wasn't happy on how it was turning out.

For all my roofing needs I use left over cereal boxes and open them up carefully to get max use out of them. I cut them in strips and start off with the lower run first. I cut the strips half way and bend each tile the opposite way then smooth it out before glueing.

Once the first strip is glued I use a pen to mark the follow on cuts on the next strip. I always stagger these, like a normally shingled roof. The next run is then placed halfway down the previous run up until you reach the apex. Once both sides are complete, I take a final piece of card stock twice as wide as the shingle strips and bend it in half and glue it down.

If I want to do a simple flat tin roof I just cut out on big
piece of card stock and add some thin strips spanning the whole roof.

I also put the shiny side out for paintable cardstock and use the dull brown side when I want to mount a sign.

For scribing the ends of boards I selected a straight edge and just marked every other board then did the same on the opposite side of the building.

You can also recycle barbeque skewers for round stock or adobe poles or make a whole fort out of them.

I used 1/8 inch thick balsa for all my buildings including the roofs in order to make a more solid piece.

Originally I was going to drybrush the buildings but immediately found out that was a waste of time and simply sloshed on as much paint as could done.

Hope this helps have fun building.

Wednesday, May 13, 2009

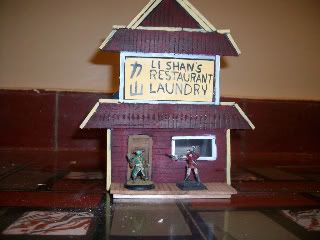
Li Shan's is open for business

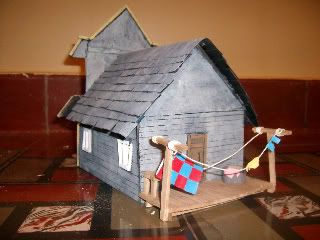
Finished painting the Chinese Restaurant/Laundry. I added a few doo dads for the rear of the facility. A meat cutting table, wash bucket and scruber, I also did some laundry poles and some drying cloths. As you can see there are already customers waiting to get in :)


Photobucket

Photobucket

Monday, May 11, 2009

Old Church added to Cerro Grande

Just finished (95%) a spanish style adobe church for Cerro Grande. It still needs a bell for the tower. I borrowed the idea to make it a dice tower from fellow TMPer Gungnir. I found some pics off the net and drew a sketch of what I wanted and it came out pretty ok. I re-did the missing adobe and brick technique on the sides of the Church and bell tower.

Photobucket

I covered the balsa wood structure with spackle and then primed it black as usual. I also used my typical cereal box roofing strips. The dome didn't come out as well as I would have liked but it will suffice.

The Chinese restaurant is primed and will be painted shortly. I will be adding an adobe house or two once I see a design I like.

Monday, April 13, 2009

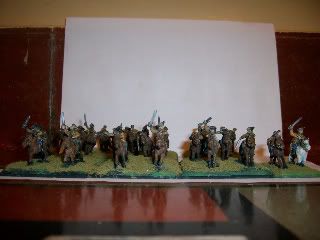
Cossaks done!

I have finished my Cossacks. Well mostly, I am missing like one but maybe I will find one on ebay some day but they are pretty much finished and based. I have also finished a couple of Strelkovy platoons only Seven more to go to have a full strength Strelkovy Horde. Try and pin my Russians lol. I must also remember to have sufficient amount of Commisars.

These figs are FOW as are the rest of my Soviets. I will retake the pics of the platoon and dead markers as well as my scratch built Objective marker/HQ.

I have several stands of mgs and mortars on the paint table but am going on vacation this week so probably wont get to them till May. Enjoy

Photobucket

Tuesday, April 7, 2009

Hordes are a comin'

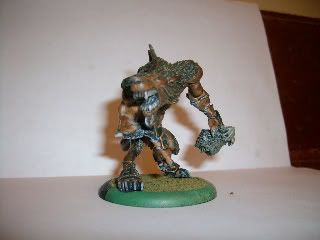
I painted these figs a while ago but wanted to share them anyways. They are the Hordes figures from the main box set. I want to get some more of these puppies lol. I don't paint eyes as they all turn out cock eyed and it doesn't really add that much for me. I did add a few things like the fallen stone on one doggie base and I added the dragon's head to the giant wolf's hand.

Photobucket

My Warcaster

Photobucket

Doggie 1

Photobucket

Doggie 2

Photobucket

Big Doggie
 
hit
Click for hit counter code.